Jewelry photography can look stunning in real life, but raw images often don’t capture that same beauty. Small dust particles, harsh reflections, uneven lighting, and dull shine can make even high-end jewelry look average.
That’s why learning how to retouch jewelry photos is so important.
With the right approach, you can turn ordinary images into clean, sharp, and high-quality visuals that truly represent your product—and help you attract more customers.
Why Jewelry Photo Retouching Matters
Jewelry is all about detail.
Customers zoom in, check clarity, and compare products before making a decision. If your image looks slightly off, they may lose confidence instantly.
Retouching helps fix those small but critical issues. It improves clarity, enhances shine, and ensures your product looks polished without looking fake.
In simple terms, better images lead to better trust—and better sales.
Before You Start: Prepare Your Image Properly
Good retouching starts with a good base image.
Make sure your photo is well-lit and in focus. Use a clean background and avoid unnecessary shadows. The cleaner your original image is, the easier the retouching process becomes.
Always shoot in high resolution so you don’t lose detail during editing.
Step-by-Step: How to Retouch Jewelry Photos
Clean Up Dust and Imperfections
Start by zooming into your image.
You’ll often notice tiny dust particles, scratches, or fingerprints that aren’t visible at first glance. Use tools like the healing brush or clone tool to remove these imperfections.
This step alone can dramatically improve the overall look of your image.
Fix Lighting and Exposure
Jewelry images often suffer from uneven lighting.
Adjust brightness, contrast, and exposure carefully. The goal is to create a balanced image where details are visible without making the photo too bright or washed out.
Keep the lighting natural—avoid over-editing.
Correct Colors for Accuracy
Color accuracy is critical in jewelry photography.
Gold should look like gold, silver should look like silver, and gemstones should reflect their real color. Use color correction tools to fix any unwanted color casts.
This helps customers trust that what they see is what they’ll receive.
Enhance Shine and Details
Jewelry should look vibrant but not artificial.
Enhance highlights slightly to bring out shine, and sharpen the image to improve clarity. Focus on edges and fine details to make the piece stand out.
Be careful not to overdo it—too much sharpening can make the image look unrealistic.
Remove or Control Reflections
Reflections are one of the biggest challenges in jewelry photography.
Sometimes they add beauty, but often they become distracting. Use retouching techniques to soften or remove unwanted reflections while keeping the natural look intact.
Smooth Metal Surfaces
Metal surfaces can look uneven due to lighting and reflections.
Use soft retouching techniques to smooth out these areas while keeping the natural texture. The goal is a clean, polished finish—not a plastic look.
Final Touch and Background Adjustment
Make sure your background is clean and distraction-free.
Most eCommerce platforms prefer a pure white or neutral background. Adjust shadows if needed to keep the image realistic.
Finally, review your image at different zoom levels to ensure everything looks consistent.
Common Mistakes to Avoid
Many beginners make the mistake of over-editing jewelry images.
Too much sharpening, excessive shine, or unrealistic colors can make your product look fake. Customers can notice this quickly, and it can reduce trust.
Another common mistake is ignoring small details like dust or uneven edges. These tiny flaws become very noticeable in close-up shots.
The key is balance—enhance the image without losing its natural look.
Tools You Can Use for Jewelry Retouching
Most professionals use tools like Photoshop or similar editing software.
These tools give you full control over details, lighting, and color. Even basic tools can work, as long as you focus on clean and careful editing.
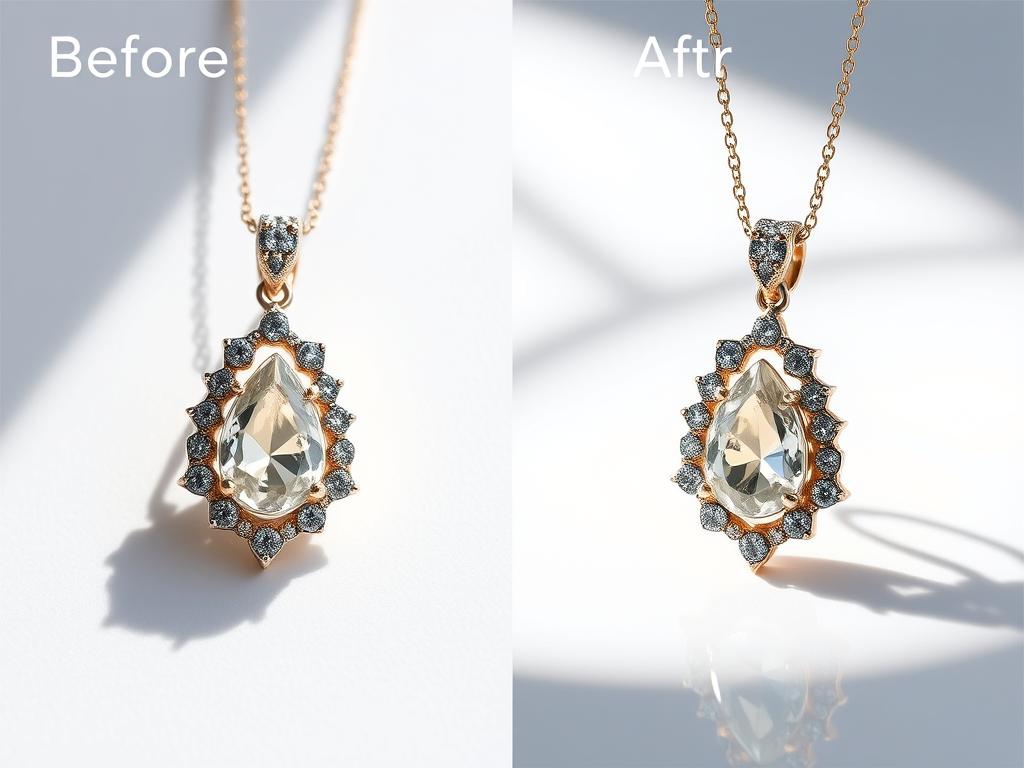
Real Example: What Difference Retouching Makes
Imagine a diamond ring photo straight from the camera.
It may look slightly dull, with minor dust and uneven shine. After proper retouching, the same image becomes brighter, cleaner, and more detailed.
The diamond sparkles, the metal looks smooth, and the entire image feels premium.
That’s the power of proper jewelry retouching.
Should You Retouch Yourself or Outsource?
If you have time and experience, you can handle basic retouching yourself.
But for consistent, high-quality results—especially for large product catalogs—outsourcing is often a better option.
Professional retouchers understand the details and can deliver polished images faster, saving you time and effort.
Final Thoughts
Learning how to retouch jewelry photos can completely change how your products are presented online.
It’s not just about making images look better—it’s about making them trustworthy, consistent, and appealing.
When your photos reflect the true quality of your jewelry, customers feel more confident—and that leads to better results for your business.
FAQ: How to Retouch Jewelry Photos
What is jewelry photo retouching?
It’s the process of improving jewelry images by removing imperfections, correcting colors, and enhancing overall quality.
Can beginners retouch jewelry photos?
Yes, but it takes practice. Starting with simple edits like dust removal and brightness adjustment is a good approach.
How long does it take to retouch a jewelry photo?
It depends on complexity, but a detailed image can take anywhere from a few minutes to over an hour.
What is the most important step?
Cleaning imperfections and maintaining natural look are the most important parts of jewelry retouching.


