In this articles we will learn how to photograph jewelry with iphone at home. Have you ever spent hours creating beautiful jewelry, only to take a photo with your iPhone and feel disappointed by the results?
The ring looks dull.
The diamond doesn’t sparkle.
The gold appears yellow.
The necklace looks flat and lifeless.
If that sounds familiar, you’re not alone.
Many jewelry business owners, Etsy sellers, Shopify store owners, and handmade jewelry creators struggle to capture the true beauty of their products. The good news is that you don’t need a professional DSLR camera or an expensive photography studio to create attractive jewelry photos.
Modern iPhones are incredibly powerful, and with the right techniques, you can take professional-looking jewelry images that help attract buyers and increase sales.
In this guide, we’ll walk through everything you need to know about photographing jewelry with an iPhone, including lighting, backgrounds, camera settings, styling tips, common mistakes, and editing techniques.
Why Good Jewelry Photography Matters
Before diving into camera settings and photography tips, let’s talk about why jewelry photography is so important.
Unlike a physical jewelry store, online shoppers cannot touch, hold, or inspect your products.
Your photos become your salesperson.
Poor images can make even expensive jewelry look cheap, while great photography can make customers stop scrolling and take a closer look.
Good jewelry photography helps:
- Build trust with potential buyers
- Highlight craftsmanship and details
- Increase click-through rates
- Improve conversion rates
- Reduce customer hesitation
- Create a professional brand image
Many jewelry sellers focus heavily on product quality but overlook photography. Unfortunately, even beautiful jewelry can struggle to sell if the photos don’t communicate its value.
Can You Really Take Professional Jewelry Photos with an iPhone?
Yes.
In fact, many successful jewelry sellers use their iPhones for product photography.
Modern iPhones offer:
- High-resolution sensors
- Advanced image processing
- Excellent color accuracy
- Macro photography capabilities
- Portrait mode options
The biggest factor isn’t the camera.
It’s the photographer’s understanding of light.
A professional photographer can create stunning jewelry images with an iPhone, while a beginner can take poor photos with a $3,000 camera.
Learning how to control lighting and composition will make a bigger difference than upgrading equipment.
The Biggest Challenges in Jewelry Photography
Jewelry is one of the hardest products to photograph.
Why?
Because jewelry reflects everything around it.
Metal surfaces act like tiny mirrors.
Gemstones interact with light differently than other products.
Small imperfections become highly visible in close-up images.
Common challenges include:
Reflections
Gold, silver, and platinum easily reflect surrounding objects.
You may accidentally capture reflections of yourself, your phone, windows, or nearby furniture.
Lack of Sparkle
Diamonds and gemstones often look dull when lighting isn’t positioned correctly.
Dust and Fingerprints
Tiny particles that seem invisible to your eyes become obvious in high-resolution photos.
Blurry Images
Because jewelry contains small details, even slight camera movement can reduce sharpness.
Understanding these challenges will help you avoid frustration later.
What Equipment Do You Need?
One of the biggest misconceptions is that jewelry photography requires expensive equipment.
For beginners, a simple setup is enough.
Essential Equipment
- iPhone
- Jewelry piece
- White background
- Window light
- Microfiber cloth
- Smartphone tripod
Helpful Upgrades
- Lightbox
- Reflector cards
- Macro lens attachment
- Bluetooth shutter remote
Start simple.
You can always upgrade later.
How to Photograph Jewelry with iPhone: A Step by Step Complete Guide
Your jewelry may look beautiful in person, but capturing that same beauty in a photo can be challenging. In this guide, you’ll learn how to photograph jewelry with an iPhone using simple lighting techniques, camera settings, styling tips, and practical examples. Whether you’re selling on Etsy, Shopify, Amazon, or social media, these proven methods will help you create professional-looking jewelry photos without investing in expensive equipment.
Step 1: Clean the Jewelry Thoroughly
Before taking a single photo, clean your jewelry.
This step alone can dramatically improve image quality.
A fingerprint on a ring may not be noticeable in person, but it becomes highly visible in close-up photography.
Inspect the jewelry under bright light and remove:
- Dust
- Fingerprints
- Smudges
- Lint
- Water spots
Many professional jewelry photographers spend more time cleaning products than taking photos.
That’s because editing dust later is far more time-consuming.
Step 2: Find the Best Light in Your Home
Lighting is the most important part of jewelry photography.
Even the newest iPhone cannot compensate for poor lighting.
Why Natural Light Works Best
Natural window light is soft, flattering, and easy to use.
Place your setup near a large window where indirect sunlight enters the room.
The light should feel bright but not harsh.
Avoid direct sunlight because it creates:
- Harsh shadows
- Overexposed highlights
- Strong reflections
Think of window light as a giant softbox that costs nothing.
Step 3: Create a Simple Jewelry Photography Setup
You don’t need a studio.
Place a white poster board on a table near a window.
Position the jewelry in the center.
Use another white board opposite the window to bounce light back onto the jewelry.
This simple setup creates soft, even lighting that works surprisingly well.
Many successful Etsy sellers use almost this exact setup.
Step 4: Choose the Right Background
Background selection affects how customers perceive your products.
A cluttered background distracts viewers.
A clean background helps jewelry stand out.
Good background options include:
- White poster board
- White acrylic sheets
- Marble surfaces
- Neutral gray backgrounds
Avoid:
- Bright colors
- Busy patterns
- Distracting textures
When customers view your photos, your jewelry should be the star of the image.
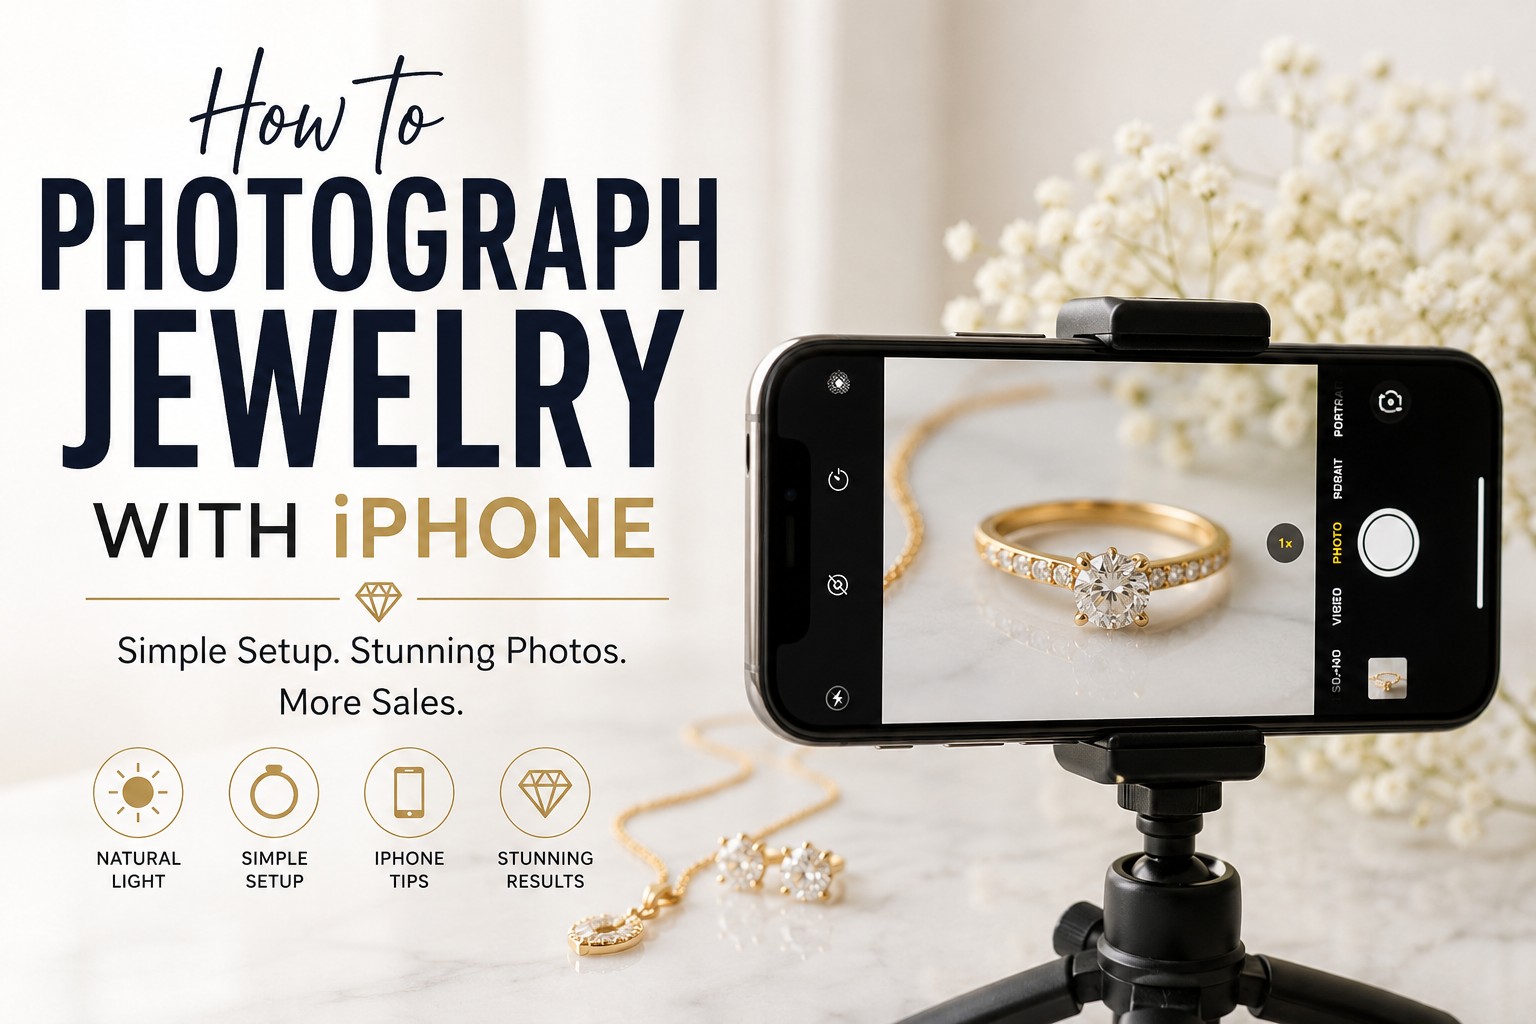
Step 5: Set Up Your iPhone Correctly
Many people simply open the camera app and start shooting.
A few adjustments can improve your results significantly.
Turn Off Flash
Flash creates harsh reflections on metal and gemstones.
Always use natural or continuous lighting instead.
Use Grid Lines
Grid lines help you align products properly.
A well-centered image appears more professional.
Tap to Focus
Always tap directly on the jewelry.
This tells the camera exactly where to focus.
Adjust Exposure
After focusing, slide your finger up or down to control brightness.
Slightly reducing exposure often helps preserve gemstone details.
Step 6: Make Gemstones Sparkle Naturally
One of the biggest frustrations for jewelry sellers is capturing sparkle.
Many beginners assume editing creates sparkle.
In reality, sparkle begins during photography.
Small changes in angle can dramatically affect how light interacts with gemstones.
Rotate the jewelry slightly.
Move your camera position.
Observe how light enters the stone.
Sometimes a tiny adjustment creates a dramatic improvement.
Patience is often the secret.
Step 7: Photograph Multiple Angles
Customers want confidence before making a purchase.
One image rarely provides enough information.
Photograph:
Front View
Shows overall design.
Side View
Displays craftsmanship and dimensions.
Back View
Builds transparency and trust.
Close-Up View
Highlights gemstone quality and details.
The more visual information customers receive, the easier it becomes for them to buy.
Step 8: Capture Lifestyle Photos
While white-background photos are important, lifestyle images help customers imagine wearing the jewelry.
Consider photographing:
- Rings on hands
- Necklaces being worn
- Bracelets in natural settings
- Earrings on models
Lifestyle images create emotional connections and often perform better on social media.
Common Mistakes That Make Jewelry Look Cheap
Many jewelry sellers unknowingly make mistakes that reduce product value.
These include:
- Using flash
- Photographing dirty jewelry
- Overediting colors
- Using cluttered backgrounds
- Taking blurry images
- Uploading low-resolution photos
Avoiding these mistakes can instantly improve your product presentation.
How to Edit Jewelry Photos on iPhone
Even great photos usually need minor adjustments.
Focus on improving:
- Brightness
- Contrast
- White balance
- Sharpness
Avoid heavy filters.
Customers want realistic product representations.
The goal is enhancement, not transformation.
When Professional Jewelry Retouching Becomes Necessary
As your jewelry business grows, photography alone may not be enough.
Professional retouching helps remove:
- Dust particles
- Scratches
- Reflections
- Background distractions
Many successful jewelry brands combine in-house photography with professional editing services to achieve a polished, luxury appearance.
Final Thoughts
Learning how to photograph jewelry with an iPhone isn’t about owning expensive equipment.
It’s about understanding light, paying attention to details, and presenting your products in a way that builds customer confidence.
Start with a clean product, soft natural light, a simple background, and a stable camera setup.
As your skills improve, you’ll create images that showcase your jewelry beautifully and help your business stand out in a competitive market.
Frequently Asked Questions
Can I take professional jewelry photos with an iPhone?
Yes, modern iPhones are capable of taking high-quality jewelry photos. With proper lighting, a clean background, and the right camera settings, you can create professional-looking images suitable for online stores, social media, and marketplaces like Etsy or Amazon.
What is the best iPhone setting for jewelry photography?
For jewelry photography, use the standard Photo mode, turn off the flash, tap to focus on the jewelry, and slightly reduce the exposure to preserve details in shiny metals and gemstones. Using grid lines can also help improve composition.
How do I make jewelry sparkle in iPhone photos?
The key to capturing sparkle is proper lighting and positioning. Place the jewelry near a window with soft natural light and experiment with different angles until the gemstones catch and reflect the light naturally. Small adjustments can make a significant difference.
Do I need a lightbox to photograph jewelry with an iPhone?
No, a lightbox is not required. Many jewelry sellers achieve excellent results using natural window light and a simple white background. However, a lightbox can help create more consistent lighting and reduce reflections.
Why does my jewelry look dull in photos?
Jewelry often looks dull when there isn’t enough light or when the lighting angle is incorrect. Dust, fingerprints, poor focus, and overexposure can also reduce the appearance of sparkle and detail.
What background is best for jewelry photography?
White, light gray, or neutral-colored backgrounds are usually the best choice. They help keep the focus on the jewelry and create a clean, professional appearance that works well for eCommerce websites.
Should I use flash when photographing jewelry with an iPhone?
No, using flash is generally not recommended. Flash can create harsh reflections, bright hotspots, and unnatural colors on metal and gemstones. Natural or continuous lighting typically produces better results.
How can I take sharp jewelry photos with an iPhone?
Use a tripod or stable surface to keep your iPhone steady. Tap on the jewelry to focus, ensure there is plenty of light, and avoid moving the camera while taking the shot.
Can I photograph jewelry for Etsy using an iPhone?
Absolutely. Many Etsy sellers use iPhones to create product photos. The most important factors are good lighting, clean product presentation, multiple viewing angles, and clear images that show details accurately.
How many photos should I take of each jewelry piece?
It’s recommended to capture at least 5 to 8 photos from different angles. Include front, side, back, close-up, and lifestyle shots so potential buyers can fully inspect the item before purchasing.
What are the biggest mistakes to avoid in jewelry photography?
Some common mistakes include using flash, photographing dirty jewelry, choosing distracting backgrounds, taking blurry images, and applying excessive editing that makes the jewelry look unrealistic.
Do jewelry photos need editing after they are taken?
Yes, most jewelry photos benefit from basic editing. Adjusting brightness, contrast, white balance, and removing dust or minor imperfections can help create a more polished and professional final image.
Can I use Portrait Mode for jewelry photography?
Portrait Mode can work well for lifestyle images or jewelry worn by a model. However, for product photography, standard Photo mode is usually a better choice because it preserves fine details and edges more accurately.
How do I photograph rings with an iPhone?
Clean the ring thoroughly, place it near a natural light source, use a simple background, and photograph it from multiple angles. Close-up shots are especially important for showcasing gemstone details and craftsmanship.
Is professional jewelry retouching still necessary if I use an iPhone?
Even with a high-quality iPhone camera, professional retouching can improve jewelry photos by removing dust, scratches, unwanted reflections, and background imperfections. This is why many jewelry brands combine good photography with expert editing.


