When it comes to selling or renting a property, visuals play a bigger role than most people realize. Even a well-shot photo can look flat, uneven, or uninviting without professional retouching. That’s why real estate photo retouching has become a critical part of modern property marketing.
Real estate retouching is not about altering reality — it’s about presenting the property in a clean, accurate, and visually appealing way. A good retouching workflow enhances the buyer’s experience and helps your listing stand out in competitive markets.
Below is a detailed, experience-based explanation of how the real estate photo retouching process actually works in professional studios.
Importing & Organizing the Raw Files
Every project starts by importing the RAW or high-resolution images into an editing environment such as Lightroom, Capture One, or Bridge.
Professionals typically sort the images by:
- Room type
- Priority shots
- Exposure brackets (for HDR work)
- Special angles or highlight shots
A properly organized folder structure ensures consistent editing throughout the entire property.
Basic Corrections: Exposure, White Balance & Color
The first phase of retouching focuses on correcting the foundation of the image. This includes:
- Balancing exposure to reduce shadows or blown-out highlights
- Adjusting white balance to remove yellow or blue tones
- Enhancing natural colors while keeping everything realistic
- Increasing contrast and clarity for more visual depth
These basic adjustments set the tone for the rest of the retouching process.
Lens Correction & Straightening
Real estate photography often uses wide-angle lenses, which can create distortion.
Professionals correct:
- Vertical lines (walls leaning inward)
- Horizontal lines (tilted floors or ceilings)
- Barrel distortion from the lens
- Perspective imbalance
Straightening the structure of a room ensures the space looks natural and true to life — something buyers subconsciously trust.
HDR Blending or Exposure Merging
Most interior images are shot in multiple exposures to capture window details and indoor lighting.
During retouching:
- Dark, normal, and bright exposures are blended
- Window views are recovered
- Shadows become softer
- Bright spots are controlled
A well-done HDR blend keeps the image balanced without the artificial “HDR look.”
Color Enhancement & Tone Balancing
After the base exposure is set, the editor refines the image by enhancing tones such as:
- Wood textures
- Flooring
- Countertops
- Walls
- Outdoor elements
This phase ensures every material in the room appears clean and accurate.
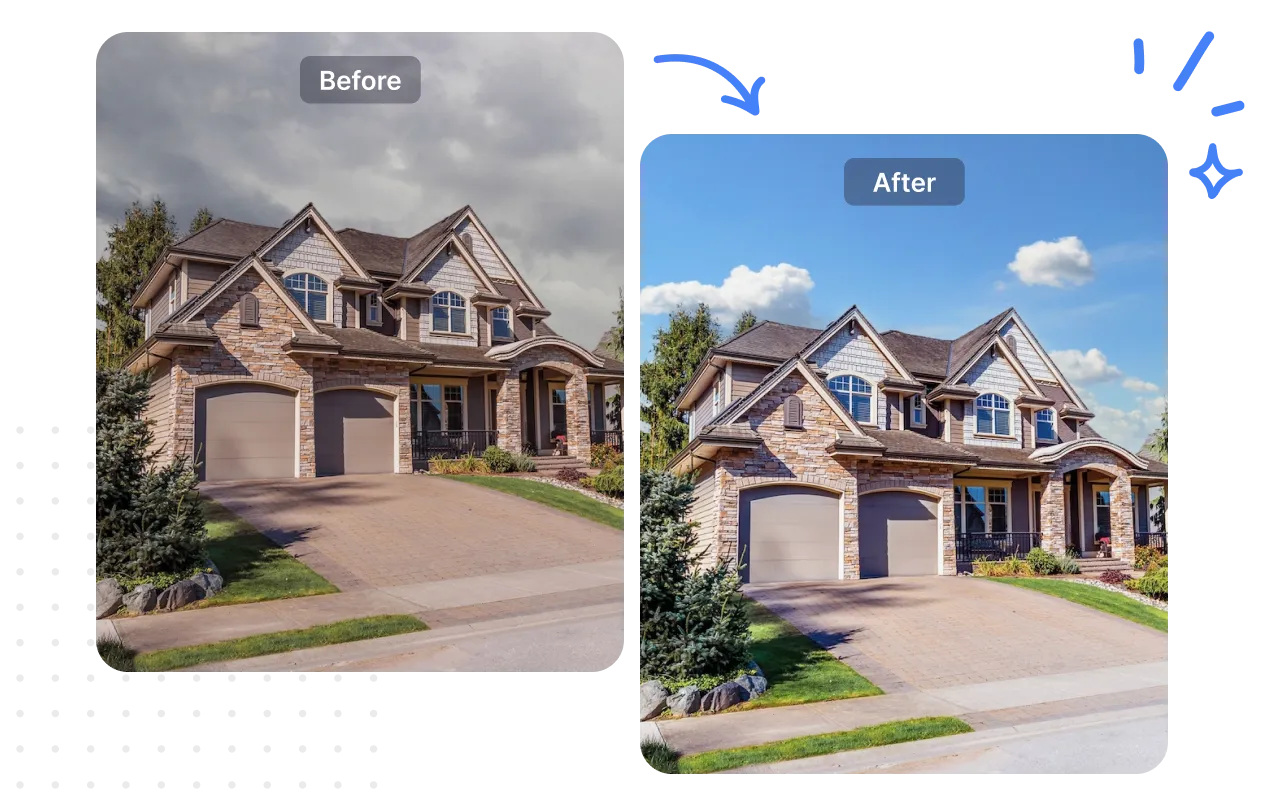
Sky Replacement & Outdoor Enhancements
Exterior photos often need additional polishing.
This may include:
- Replacing dull skies
- Brightening grass and plants
- Enhancing building color
- Removing stains or shadows
- Fixing reflections in windows
A simple sky replacement can dramatically improve curb appeal.
Object Removal & Cleanup
One of the most time-consuming parts of real estate retouching is removing unwanted items, such as:
- Electrical cords
- Trash bins
- Wall marks
- Reflections
- Misplaced objects
- Small clutter
The goal is not to fake the room — it’s simply to present it in the cleanest and most market-ready condition.
Virtual Lighting & Shadow Adjustments
Sometimes natural light isn’t enough. Editors enhance lighting with subtle techniques such as:
- Adding brightness to dark corners
- Softening harsh shadows
- Enhancing window glow
- Balancing mixed lighting (tungsten + daylight)
The room should appear evenly lit without looking edited.
Final Sharpening & Noise Reduction
Before exporting, the final step ensures the image is crisp and professional.
This includes:
- Sharpening floors, furniture, and edges
- Reducing noise from low-light photos
- Checking color consistency across all images
Consistency across the entire listing is key to a polished presentation.
Exporting & Delivering in Web-Ready Format
The final images are exported in:
- High-resolution files for print
- Web-optimized files for listing platforms
- Standard aspect ratios (usually 3:2 or 4:3)
Professionals often deliver multiple versions depending on the use case.
Why the Retouching Process Matters
A well-retouched photo does not change reality — it elevates it.
By improving lighting, color, and clarity, the photo:
- Makes rooms appear more inviting
- Helps buyers connect emotionally
- Highlights the home’s best features
- Increases listing engagement
- Speeds up decisions
Good editing creates trust and professionalism, both crucial in today’s digital real estate market.
Conclusion
Professional real estate photo retouching is more than just enhancing images—it’s about presenting properties in the best, most accurate way possible. By carefully adjusting lighting, colors, perspectives, and removing distractions, retouching helps buyers connect with the space, builds trust, and increases engagement. For agents, photographers, and property owners, a consistent and polished photo set can make listings stand out, attract more interest, and ultimately sell or rent properties faster.
FAQ
What is the difference between editing and retouching in real estate?
Editing covers basic adjustments like exposure and color. Retouching goes deeper, including object removal, sky replacement, HDR blending, and detailed correction work.
Does retouching make a property look fake?
No — when done professionally, retouching enhances a property without misrepresenting it. The goal is clarity, not perfection.
How long does real estate photo retouching take?
Most basic edits take a few minutes per photo, while advanced retouching can take anywhere from 10 to 30 minutes depending on complexity.
Why do real estate agents use professional retouching?
It helps listings stand out, increases buyer interest, and improves overall presentation. Better images often lead to faster sales.
Can retouching improve poorly taken photos?
To a point, yes. But retouching works best with high-quality original images.


