When buyers scroll through property listings, certain photos make them pause. Very often, those are dusk images. The warm lights, soft sky, and calm evening mood create an emotional connection that daylight photos alone sometimes can’t achieve. But capturing true dusk photos on location isn’t always practical. Timing, weather, and tight schedules make it difficult.
Day-to-dusk editing allows you to transform a bright daytime exterior photo into a realistic evening scene—without misleading buyers or making the image look artificial. When done correctly, it enhances the listing’s visual appeal while keeping the property honest and professional.
This guide explains day-to-dusk editing step by step, focusing on realism, balance, and buyer psychology.
What Is Day-to-Dusk Editing in Real Estate Photography?
Day-to-dusk editing is a post-processing technique where a daytime exterior photo is edited to look like it was captured during early evening or twilight. The sky becomes deeper and softer, interior lights glow warmly, and the overall scene feels calm and inviting.
The goal is not to fake reality. The goal is to recreate how the property would naturally look at dusk if the photo had been taken at the right moment.
Good day-to-dusk editing feels believable. Poor editing feels dramatic, unrealistic, and distracting.
Why Day-to-Dusk Photos Matter for Real Estate Listings
Day-to-dusk images are powerful because they tap into emotion. Buyers imagine coming home in the evening, turning on the lights, and relaxing.
Day-to-dusk editing helps because it:
- Creates emotional impact
- Highlights exterior lighting
- Makes homes feel warm and welcoming
- Helps listings stand out online
- Adds a premium look to property marketing
Many agents use dusk images as their main listing photo because they attract attention instantly.
Choosing the Right Photo for Day-to-Dusk Editing
Not every daytime photo works well for day-to-dusk editing.
The best images usually have:
- Clear sky or light clouds
- Balanced exposure
- Visible windows and interior space
- Exterior lights already installed
- Minimal harsh shadows
Photos taken in extreme midday sun or heavy overcast conditions are harder to convert naturally.
Day-to-Dusk Editing Step-by-Step

Step 1: Prepare the Base Image
Start with a clean, well-exposed daytime photo.
Correct lens distortion and perspective.
Adjust overall exposure so highlights and shadows are balanced.
Remove distractions like cars, bins, or clutter.
A strong base image makes the dusk effect look realistic later.
Step 2: Replace or Enhance the Sky
The sky sets the mood.
Replace the daytime sky with a natural dusk or twilight sky that matches the scene’s perspective and lighting direction.
Avoid dramatic sunsets unless they fit the property style.
Keep colors soft—deep blues, gentle purples, or warm gradients work best.
Overly colorful skies can make the photo feel fake.
Step 3: Darken the Exterior Gradually
Dusk is not night.
Lower overall brightness slightly while maintaining detail in the house and surroundings.
Avoid crushing shadows or making the property look underexposed.
The transition from day to evening should feel smooth and natural.
Step 4: Turn On Interior Lights
Interior lighting is the heart of day-to-dusk editing.
Add warm light to windows carefully.
Match light intensity across all visible rooms.
Avoid pure yellow or orange tones—soft warm white looks more realistic.
Uneven or overly bright window lights are one of the most common mistakes.
Step 5: Enhance Exterior Lighting
If the property has porch lights, pathway lights, or garage lights, gently enhance them.
Add subtle glow and reflection.
Keep light spill controlled.
Avoid exaggerated light halos.
Lighting should enhance the property, not overpower it.
Step 6: Balance Colors and White Balance
Dusk scenes rely heavily on color balance.
Cool the overall image slightly while keeping interior lights warm.
Ensure walls, roofs, and landscaping maintain natural color tones.
This contrast between cool exterior and warm interior creates visual depth.
Step 7: Add Subtle Contrast and Depth
Increase contrast carefully to separate the house from the background.
Avoid heavy clarity or sharpness.
Maintain a soft, calm evening feel.
Day-to-dusk images should feel peaceful, not dramatic.
Step 8: Final Refinements
Check edges around roofs and trees.
Ensure sky blending looks clean.
Remove color banding or noise.
Match the dusk image with the rest of the listing photos.
Consistency is key for professional presentation.
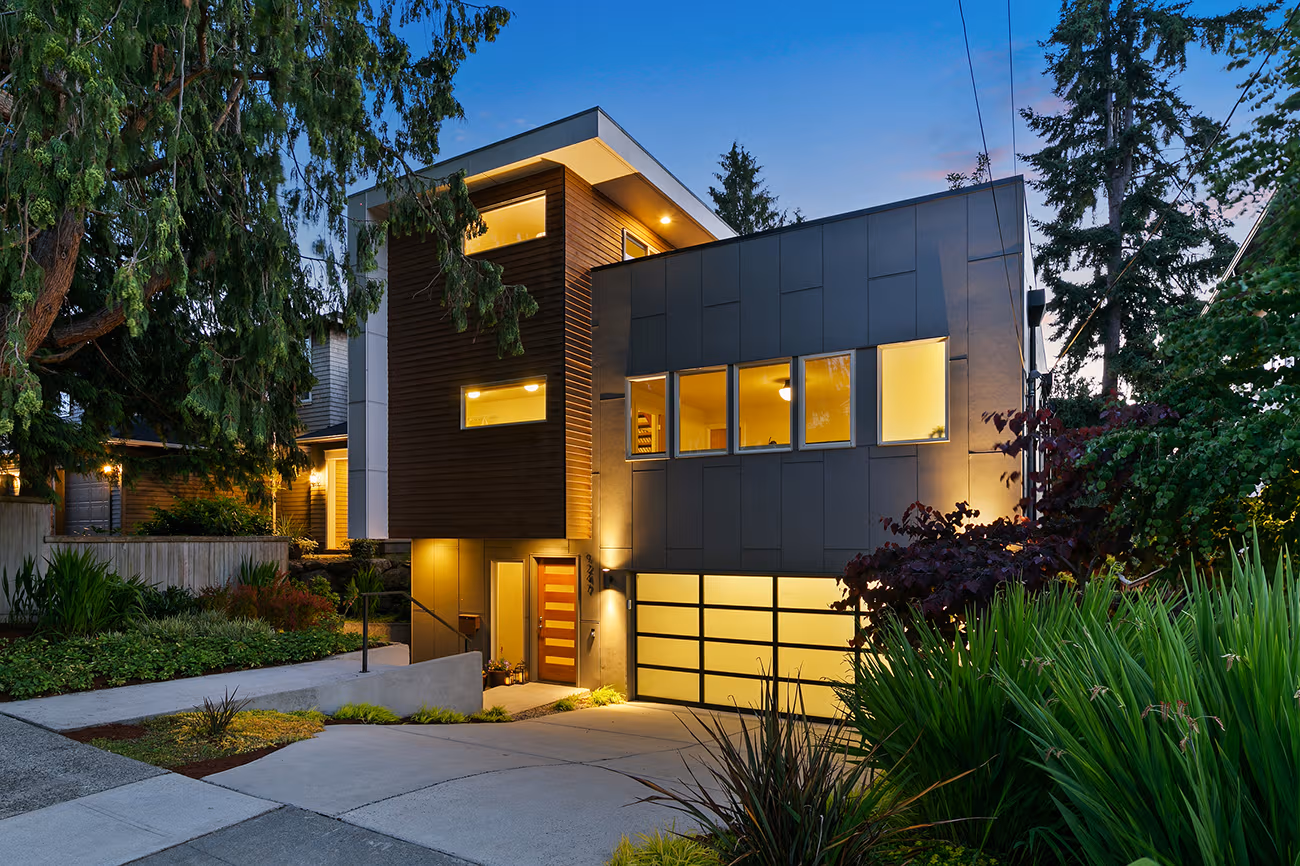
What Makes Day-to-Dusk Editing Look Real
A realistic day-to-dusk photo:
- Matches lighting direction
- Uses natural sky colors
- Has balanced window lighting
- Avoids harsh contrasts
- Feels calm and believable
If viewers stop noticing the edit and start noticing the house, you’ve done it right.
Common Day-to-Dusk Editing Mistakes
Many edits fail because of:
- Over-saturated skies
- Extremely dark exteriors
- Bright, unnatural window lights
- Mismatched lighting direction
- Heavy glow effects
Subtlety always wins in real estate editing.
Day-to-Dusk Editing vs True Dusk Photography
True dusk photography captures real lighting but requires perfect timing and conditions.
Day-to-dusk editing offers flexibility and consistency.
Most agents use edited dusk images for marketing while keeping daytime photos for accuracy and detail.
How Day-to-Dusk Editing Helps Sell Properties
Well-edited dusk images:
- Increase listing engagement
- Improve first impressions
- Create emotional connection
- Add a premium feel to marketing
Buyers may not know why they like the image—but they feel it.
Conclusion
Day-to-dusk editing is one of the most powerful tools in real estate photo editing when used with care. It adds emotion, warmth, and visual interest without compromising honesty. The key is restraint. Soft skies, balanced lighting, and realistic colors always outperform dramatic effects.
When done properly, day-to-dusk editing doesn’t just show a property—it helps buyers imagine living there.
FAQ
Is day-to-dusk editing misleading?
No, when done realistically and used as a feature image alongside daytime photos.
Can every exterior photo be converted to dusk?
No. Photos with harsh lighting or poor exposure may not convert naturally.
How many dusk images should a listing include?
Usually one or two images are enough.
Does day-to-dusk editing work for all property types?
It works best for residential homes, luxury listings, and properties with exterior lighting.
Should dusk images replace daytime photos?
No. They should complement, not replace, standard listing photos.


