Your product photos do so much more than just show what you’re selling — they tell a story, build trust, and gently guide people toward hitting that “buy” button. Whether you run a small Etsy shop, are growing your brand, or just getting started, having eye-catching photos can truly make all the difference.
The great news? You don’t need fancy equipment or a big studio to take professional-looking pictures. With a few simple product photography tips, some patience, and a bit of practice, you can create images that make your products shine and grab attention.
Here’s an easy-to-follow guide full of practical product photography tips to help you take better photos, edit like a pro, and show off your products in the best light possible. Let’s get started on making your products stand out and connect with your customer
Why Product Photography Really Matters
Remember the last time you bought something online? Did you scroll past blurry, dark, or awkward photos? Probably. Because when people shop online, the pictures are everything.
Your photos are your silent sales person. They never get tired, they never make mistakes, and they’re working 24/7 to help you sell.
If your images look good, people trust you more. If not, they’ll quickly click away — no matter how great your product actually is.
Quick Product Photography Tips You Can Start Using Today
These simple tips will help you take better photos, make your products look amazing, and attract more customers—no fancy gear needed.
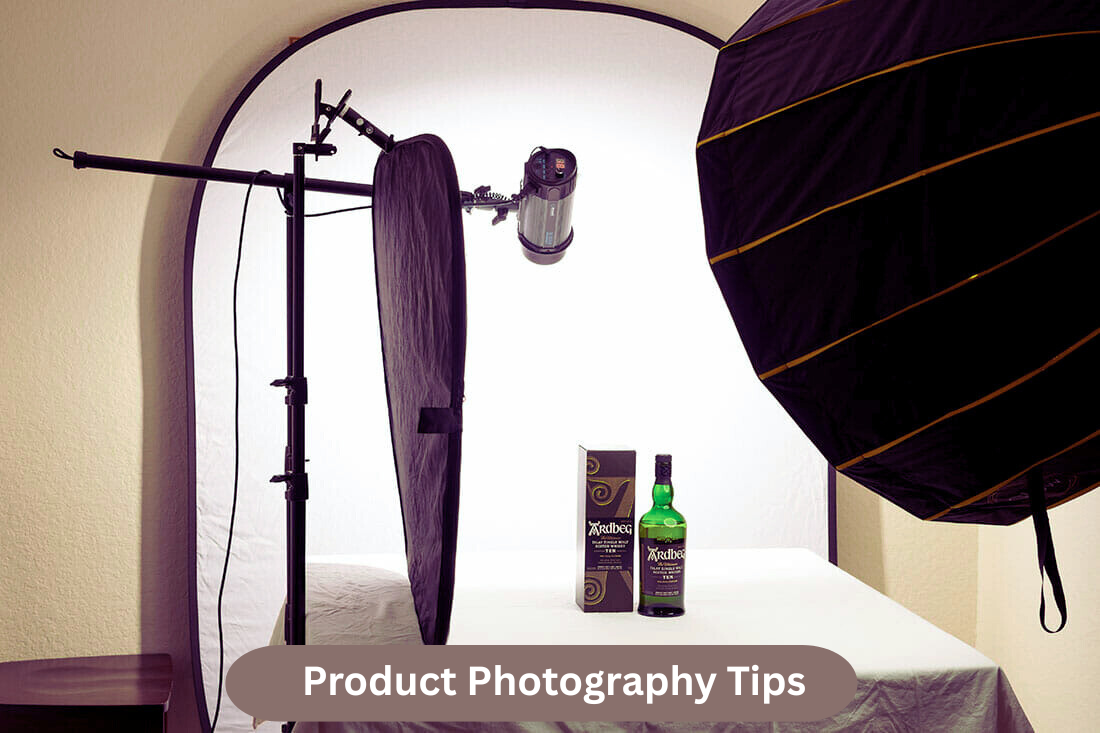
1. Use Natural Light Whenever You Can

Lighting is everything when it comes to photography. The good news is that natural light is free and super flattering.
Try shooting near a big window during the day — the soft, indirect sunlight will make your products look crisp and colorful. Avoid direct sunlight—it creates harsh shadows and bright spots that can hide details and make colors look off. Try using soft, even light for the best results.
If natural light isn’t an option, you can invest in affordable softbox or ring lights that mimic daylight.
2. Keep Your Background Simple and Clean

A busy or messy background can steal the spotlight from your product. Most sellers find a plain white background works best because it’s clean, professional, and shows your product clearly.
You don’t need to buy anything fancy — a white poster board, foam board, or even a smooth white sheet works well.
If you want lifestyle shots, pick backgrounds that add a bit of warmth or texture without distracting from the product. Think wood, fabric, or stone surfaces.
3. Steady Your Camera for Crisp Shots

Nothing kills a great photo like blur. If you’ve got a tripod, use it — it’s a simple way to keep your shots sharp and steady.
No tripod? No problem. Just place your camera or phone on something sturdy — like a table or a few books — and use the timer or a remote to snap the shot without any blur.
Also, don’t forget to clean your lens before shooting. Even a little dust or a smudge can spoil a great photo — make sure your product and lens are spotless before you shoot.
4. Show Your Product From Every Angle

Customers can’t hold or touch your product online, so make sure you give them the full picture.
Take shots from all sides — front, back, sides — and zoom in on details that matter. Include something familiar in the frame, like a hand or a coin, so people get a sense of scale.
5. Keep Your Style Consistent

Having a consistent style makes your brand look professional and helps customers recognize you.
Try to use the same background, lighting, and editing style across all your photos. This helps your store look professional and consistent, making a great impression on shoppers.
If you work with a team, make a simple style guide to keep everyone on the same page.
6. Edit Photos, But Keep It Real

Editing is important — it helps you fix lighting, balance colors, and clean up small distractions.
Use tools like Lightroom or Snapseed to brighten your photos, sharpen details, and crop nicely.
But don’t go overboard. Make sure your edits reflect the real product. You don’t want to mislead buyers and risk returns.
7. Add Lifestyle Shots to Tell a Story

Lifestyle photos put your product in action, helping customers picture how it fits into their everyday lives.
If you sell mugs, show someone sipping coffee. Jewelry? Have someone wear it. These photos create an emotional connection that goes beyond just the product.
8. Optimize Your Images for the Web

Big image files slow down your website and can frustrate shoppers.
Before uploading, shrink your images to load quickly without losing quality. Use JPEG for photos and PNG when you need a transparent background.
Also, add descriptive alt text — include your focus keyword “product photography tips” — so search engines can find your images and boost your SEO.
Why Great Product Photos Are a Must
In online shopping, your photos are often the first—and sometimes only—chance to impress potential buyers. High-quality, clear images build trust by showing your product exactly as it is, making customers feel confident about their purchase. Without great photos, even the best products can get overlooked. Investing time in your product photography pays off with higher sales and fewer returns.
Quick Editing Tricks to Boost Your Photos
Editing is where your product photos really come to life. Small adjustments like brightening colors, sharpening details, or cropping for better focus can make a huge difference. You don’t need expensive software to start — user-friendly apps like Snapseed or Lightroom Mobile offer powerful tools that are easy to learn.
However, editing can also be time-consuming, especially when you have a large number of photos to process. That’s where outsourcing comes in. Partnering with a professional team, like Graphics Arts Solution, lets you save valuable time while ensuring every image is polished to perfection. Their expert editors handle everything from background removal to color correction with careful attention, delivering consistent, high-quality results that align with your brand.
Outsourcing your photo edits means you can focus more on growing your business while trusting the experts to make your products look their best.
Final Thought
Great product photography isn’t just about snapping pictures — it’s about telling your product’s story in a way that connects with buyers and builds trust. With the right lighting, simple editing tricks, and a clear vision, anyone can create images that stand out and drive sales.
Keep in mind, you don’t have to handle everything by yourself. Outsourcing editing to experts like Graphics Arts Solution can save you time and stress, while giving your photos that professional polish they need. Whether you’re just starting or scaling up, investing in quality product photos is one of the smartest moves for your business growth.
Start practicing these tips today and watch your products—and your sales—shine brighter than ever.
Frequently Asked Questions (FAQs)
Do I need an expensive camera for good product photos?
Not necessarily! Many smartphones today have powerful cameras that, combined with good lighting and composition, can produce excellent product images.
How important is editing in product photography?
Editing is crucial. It helps fix lighting issues, sharpen details, and ensure your photos look consistent and professional. Small edits can quickly make your products look sharper, cleaner, and more professional.
Can I outsource my photo editing?
Absolutely! Outsourcing to professional services like Graphics Arts Solution can save you time and deliver high-quality, consistent edits — perfect for busy sellers or brands with large image libraries.
What’s the best lighting setup for product photos?
Natural, soft daylight is ideal. Avoid harsh direct sunlight or shadows. If natural light isn’t available, use diffused artificial lights like softboxes or ring lights.
How many product angles should I photograph?
Try photographing your product from different angles—front, back, sides, and close-ups—so customers get the full picture and feel confident buying.


